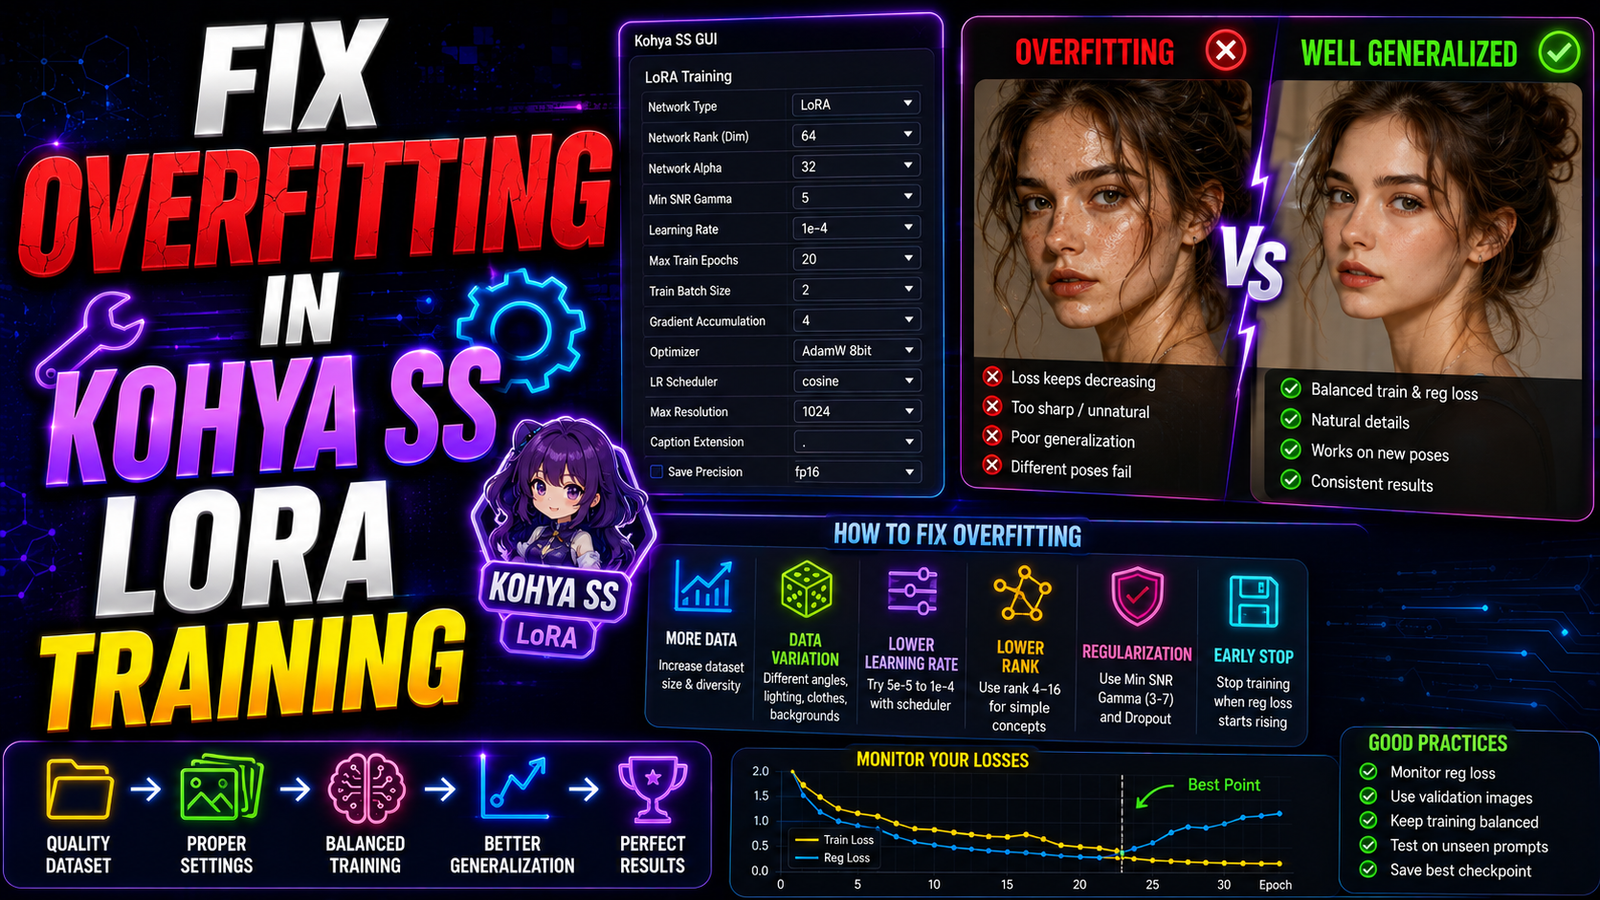
Training a local artificial intelligence model is an incredible technical achievement. You curate a flawless image dataset carefully. You install the Kohya SS graphical user interface on your computer. You configure your hardware settings and launch the lengthy rendering process. After waiting for an hour, you load your brand new Low-Rank Adaptation (LoRA) into ComfyUI. You type a basic text prompt and press the generate button. Suddenly, your screen fills with a chaotic, distorted, and deeply saturated image. Your digital asset looks completely fried and mathematically ruined. You have just experienced the most common machine learning failure. You must learn how to fix overfitting in Kohya SS LoRA Training to succeed.
Overfitting is the absolute enemy of professional digital art generation. It ruins your dataset preparation and wastes your valuable hardware electricity. Fortunately, Kohya SS provides deep mathematical tools to correct this issue. You do not need to rebuild your entire dataset from scratch. You simply need to adjust a few specific configuration sliders. This comprehensive guide breaks down the exact parameters you must change. We will rescue your broken models and restore perfect visual flexibility.
What is Model Overfitting Exactly?
To solve this mathematical problem, you must understand how artificial intelligence learns. A neural network is supposed to learn the general concept of an object. If you train a model on a specific character, it should learn their face shape. It should learn their specific haircut and eye color. It should not memorize the exact background of your training photos.
Overfitting happens when the model stops learning general concepts. Instead, the model begins memorizing the training images exactly pixel by pixel. The neural network becomes incredibly rigid. It loses all imaginative flexibility. When you ask an overfitted model to place your character in a new environment, it completely panics. It tries to force the original training background into the new generated image. This mathematical conflict causes massive visual distortion across your entire digital canvas.
Identifying the Symptoms of an Overfitted LoRA
You must diagnose your model accurately before changing complex Kohya SS parameters. Overfitting presents several highly obvious visual symptoms. You will notice these issues immediately during your initial generation tests.
Deep-Fried Pixels and Color Banding
The most obvious symptom is extreme color saturation. Your generated images will look deeply fried. The contrast levels will become incredibly harsh and aggressive. The subtle gradients in your image will break down into ugly, blocky bands of color. If your model generates dark, crispy shadows that look unnatural, your mathematical weights are severely overfitted.
Complete Loss of Prompt Flexibility
An overfitted model completely ignores your text prompts. If you prompt your character to wear a blue jacket, they will still wear a red shirt. The model forces the red shirt because the character wore a red shirt in your training data. The mathematical weights for the red shirt became too strong. The model cannot separate the character’s face from the character’s clothing. This total loss of prompt flexibility makes your LoRA completely useless for professional web design workflows.
Adjusting Your Dataset Repetition Values
The easiest way to fix overfitting in Kohya SS LoRA Training is to reduce your image repetitions. Look at how you named your specific dataset folder. If your folder is named 40_mycharacter, you are telling Kohya to repeat every image 40 times per epoch.
If you have a large dataset of 50 images, 40 repetitions is mathematically aggressive. The model sees the same pixels too many times. It begins memorizing them instead of learning from them. You must lower this folder number significantly. Change your folder name from 40_mycharacter to 15_mycharacter or 20_mycharacter. Restart your Kohya SS training run. This simple folder renaming reduces the mathematical pressure on the neural network beautifully.
Optimizing the Number of Training Epochs
An epoch represents one complete mathematical cycle through your entire dataset. If you run too many epochs, the model will inevitably overfit. The neural network essentially overcooks in the digital oven.
Kohya SS allows you to control your maximum epochs easily. Navigate to your main training parameters tab. Locate the “Epoch” input box. If your epoch count is set to 20, reduce it to 10 immediately.
Furthermore, you must utilize the “Save every N epochs” feature. Set this specific value to 1. This brilliant feature commands Kohya SS to save a brand new .safetensors file after every single cycle. When the training finishes, you will have ten different model files. You can test each file sequentially in ComfyUI. You will physically see the exact moment the model transitions from undercooked to perfect to overfitted.
Mastering Network Rank (Dim) and Alpha
The Network Rank (also called Network Dim) determines the structural capacity of your LoRA. It represents the physical size of the mathematical brain you are building. A high Network Rank allows the model to capture massive amounts of visual detail. A low Network Rank restricts the model to learning only basic core concepts.
The Dangers of a High Network Rank
Many beginners assume a larger brain is always better. They set their Network Rank to 128 or 256. This is a massive mathematical mistake for small datasets. If you have 20 training images and a Network Rank of 128, the brain is too large. It has too much empty space. It will use that extra space to memorize the exact background noise of your images. To prevent this, lower your Network Rank directly to 16 or 32. This forces the model to ignore useless background noise completely.
Balancing the Network Alpha Parameter
The Network Alpha parameter controls the mathematical scaling of your trained weights. It directly dictates how strongly the new knowledge applies to the base checkpoint. If your Alpha is set incorrectly, your model will fry instantly.
The golden rule in modern Kohya SS training is simple. Your Network Alpha should either match your Network Rank exactly, or it should be exactly half. If your Network Rank is 32, set your Network Alpha to 16. This specific half-ratio stabilizes the learning process mathematically. It prevents the model weights from exploding into pure visual static during the final epochs.
Tuning Your Optimizer Learning Rates
The learning rate is the most sensitive parameter in your entire Kohya SS configuration. It dictates the exact speed at which your model absorbs new visual information. If the learning rate is too high, the model learns too aggressively. It overfits rapidly and destroys the mathematical tensors.
To fix overfitting in Kohya SS LoRA Training, you must lower your specific learning rates. Kohya features two distinct learning rates: the UNet and the Text Encoder. The UNet handles the visual pixel structure. The Text Encoder handles the language understanding.
Separating the Text Encoder Rate
The Text Encoder overfits much faster than the visual UNet. If the Text Encoder overfits, your model will completely ignore negative prompts. You must separate these two mathematical speeds.
Navigate to your advanced parameters tab. Set your UNet learning rate to 0.0001. Set your Text Encoder learning rate significantly lower. Set it exactly to 0.00001 (one-tenth of the UNet speed). This precise speed division allows the visual engine to learn deeply while protecting your text flexibility completely.
Selecting the Correct Learning Rate Scheduler
The learning rate does not have to remain static during the entire training run. Kohya SS provides dynamic mathematical schedulers. These schedulers change the learning speed as the training progresses over time.
If you use a “Constant” scheduler, the model learns at maximum speed until the very last second. This sudden stop often causes severe overfitting in the final epochs. You must change your scheduler dropdown menu to “Cosine” or “Cosine with Restarts”.
The Cosine scheduler acts like a physical car brake. It starts training at maximum speed. As the training approaches the final epoch, it slows the learning rate down smoothly. This gentle mathematical deceleration allows the model to settle perfectly. It prevents the weights from overcooking at the very end of the digital pipeline.
Implementing Regularization Images Effectively
Sometimes, adjusting your learning rates and folder repetitions is not enough. If you are training a specific style, the concept might bleed heavily. If you train a “cyberpunk UI” style, the model might forget how to draw standard websites entirely.
To prevent this conceptual bleeding, you must use regularization images. Regularization images act as a strict mathematical anchor. They remind the neural network what normal objects look like.
Create a separate folder named reg_dataset. Fill this folder with 100 normal, generic images of web designs. Point the Kohya SS regularization directory to this specific folder. During training, the AI will look at your custom cyberpunk designs. Then, it will immediately look at the normal designs. This comparison process stops the new concept from overwriting the entire foundational model. It contains your specific style strictly to your chosen activation keywords.
Adjusting Optimizer Weight Decay
The specific optimizer algorithm you choose plays a massive role in system stability. Standard AdamW is highly reliable. However, you can configure its internal weight decay parameter to fight visual distortion.
Weight decay mathematically punishes the model for growing its neural weights too large. It forces the artificial intelligence to keep its internal numbers small and efficient. Locate the “Optimizer Extra Arguments” box in Kohya SS. Type this exact string: weight_decay=0.1. This small argument adds a strict mathematical penalty. It prevents the tensors from exploding into the deep-fried pixel artifacts you despise.
Utilizing the X/Y/Z Plot Testing Method
You cannot guess if your settings worked blindly. You must test your new LoRA files systematically. Load your newly trained model files into your ComfyUI workspace.
Use the powerful X/Y/Z Plot custom node to run a massive generation grid. Plot your different epoch files along the X-axis. Plot different CFG scales along the Y-axis. Plot different LoRA strength weights along the Z-axis.
Generate this massive grid image securely on your local graphics card. Analyze the results visually. You will quickly identify which exact epoch file performs the best. You will see exactly when the model stops listening to prompts and starts burning the pixels. This rigorous testing protocol guarantees you only deliver the absolute highest quality assets to your freelance clients.
By mastering these complex mathematical parameters, you gain absolute control over your artificial intelligence. You understand exactly how to fix overfitting in Kohya SS LoRA Training quickly and efficiently. You transform a broken, deep-fried model into a highly flexible, production-ready design asset. Keep iterating your settings calmly, and your local digital factory will become truly unstoppable.